Any pullover sweater can be converted into a cardigan, but artistic judgement must be used in deciding whether the design would still look good with
a border that splits it up the middle.
The breaking effect of the border may be minimized
by knitting the rib in multiple colors so that the colors in the rib coordinate with the
colors in the front body pieces. This is what we have done in converting the Anasazi
design into a cardigan.
Each side of the cardigan front will have half the stitches for the pullover front, minus the center stitches to allow for the button band. The number of stitches
eliminated will be two less than the number of stitches to be knit in the band. If you are going to knit a band eight stitches wide, as in the Anasazi example shown, then six stitches (three from each center front) will be eliminated from the center of the chart.
The Vertical Twisted-Knit Rib stitch we used must be worked on an even number of stitches. If you plan to used a different stitch for the button band and want the band to have an
odd number of stitches, just subtract one stitch from that number. For example, if nine stitches will be used for the band, then eight stitches (9 minus 1) will be eliminated from the center front of the chart, four from each side of the center line.
When knitting a cardigan, remember that the buttonholes on a man's sweater are worked into the left side of the front band. On a woman's sweater, the buttonholes are worked into the right side of the band.
Crew-Neck Cardigans
The crew-neck cardigan used the same neck shaping as for
the pullover, minus the stitches from the center that will be eliminated
to allow for the addition of the front button band.
Both shoulder seams must be joined and the neck rib finished before the front button bands are knit onto the sweater.
When knitting and attaching the bands, work the right front band beginning at the bottom and finishing at the top of the neck rib. Work the left front band beginning at the top of the neck rib and working to the bottom of the sweater.
V-Neck Cardigans
If you knit a V-neck, you will begin shaping (decreasing)
one to two inches below the armhole.
For hand knitters, the decreases for the left side of the V-neck are made differently from those on the right side, so the neck will have a symmetrical look. The decreases on the left front are made one stitch in from the front edge with a [slip 1 stitch, knit 1 stitch, pass the slipped stitch over the knit stitch]. This decrease makes the decreased stitch slant to the left. The decreases on the right front are made one stitch in from the front edge with a [knit 2 stitches together].
This makes the decreased stitch slant to the right.
You will make the button band for a V-neck cardigan by starting at the bottom "wearer's right" front and working all the way around in one continuous band until you reach the bottom left front. When you reach the back neck stitches, if you have slipped them onto a holder, those will be the stitches you pick up one at a time every other row, as described below.
Vertical Twisted-Knit Rib Band
The instructions show how to attach the buttonhole and
button bands as you knit them. The method is quick and easy. It also eliminates guesswork in measuring the proper length of the bands and allows you to easily change the color of the yarn for the bands to match the main design of the sweater.
We recommend the twisted-rib pattern not only because we
like the look but because we feel it is firmer, and therefore more stable than the usual knit 1 purl 1 rib would be for a button band.
When changing colors on the front bands to match the
adjacent sweater colors, do so on the wrong side of the sweater. This places the tails from the color change at a seam, where it is easier to hide them. Purl all the stitches with the new color, and on the next row (front side) return to the rib pattern. This gives a clean transition from one color to another.
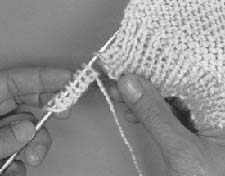
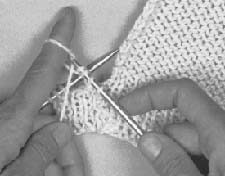
Before you begin knitting the band you will have finished the sweater fronts and back, woven in the ends, blocked the pieces, and joined the pieces at both shoulders. (And on a crew-neck sweater you also will have finished the neck rib.) Using needles one size smaller than used for sweater body, cast on 8 stitches (or an even number of stitches for desired width of band). Double-pointed needles will be less awkward to use for knitting so few stitches, if you have them in the correct size.
Pick up an edge thread of the sweater.
In pattern, work this thread together
with the first stitch of the band. Finish the row.
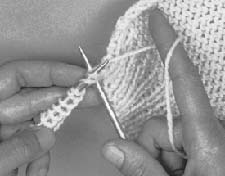
The pattern is worked as follows: Wrong side: *Knit 1, purl 1 through the back of the stitch*, repeat *to*. Right side: Slip first stitch knitwise, *Purl 1, knit 1 through back of stitch*, repeat *to*, ending with purl 1.
As you knit the band, you will continue working these two rows, attaching the inner edge of the band to the sweater at the beginning of every other
row. Slipping the first stitch knitwise of the right side row will give the outside of the band a smooth edge.
Remember to work your buttonholes spaced evenly along the correct side of the sweater.
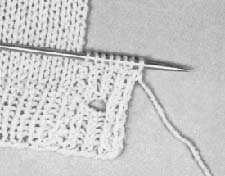
Horizontal Buttonholes
One of the few places where it is appropriate
to bind off and cast on tightly is when making buttonholes.
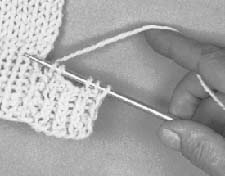
Work to the place where the buttonhole is to
be made. Bind off the number of stitches appropriate for the size of the
button being used. (three stitches have been bound off in these photos)
Work to the end of the row.
On the next row, work to the buttonhole and cast on the
same number of stitches that were bound off on the previous row. Work to
the end of the row.