| |
Sweaterscapes |
|
|
|
Opera Glove Pattern |
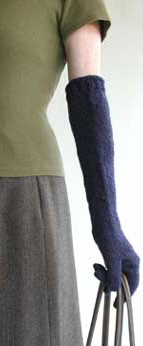
| For either day or eveningwear, these opera length gloves make a great accessory for the seasons fall/winter fashions. |
| One size. The full length opera glove is designed to come above the elbow by several inches. You may adjust finger and arm lengths. |
Size 3 DP (double pointed) needles. We recommend the short 4 inch length, especially for thumb and fingers.
2 Stitch Holders
Tapestry Needle |
| 6 stitches per inch worked in Stockinette stitch. |
Two 50gram skeins, Paton's Kroy 4-ply sock yarn.
The yarn is 75% wool and 25% nylon. Skeins are 192yards/175metres for 1ľoz/50grams.
Gloves knit with Kroy are light with a cushy spring that do not lose their shape.
|
Knitting Terms |
K - Knit
P - Purl
K2Tog - Knit 2 sts together through the front.
BL Inc - Blind Increase
(work as follows)

With your right-hand needle, pick up the stitch
below the next stitch on the left-hand needle

...and place it on the left needle.

Knit the picked-up stitch through the back, then
knit the next stitch. It should look like the two center
stitches above.
|
Cast on 60 stitches and divide evenly onto 3 needles [20 sts on each]. Knit around for 5 rows. Take care on the first row that the stitches are not twisted. K2, P2 around for 7 rows. Knit around 1 row.
Next row decrease 3 stitches - K2Tog at the center of each of the 3 needles [57sts]. Continue knitting around, working a decrease row (3 sts) every 1˝ inches 6 times, until there are 39 stitches remaining.
Knit around until glove measures 11 inches from the rib.
BL Inc 3 stitches, 1 stitch in the center of each of the three needles [42sts]. Knit around for 1 inch. |
Mark the beginning of your row with a piece of contrasting colored yarn.
K8, BL Inc 1 stitch, K24, BL Inc 1 stitch, K8 [44sts]. Work around for 1 inch.
K8, BL Inc 1 stitch, K26, BL Inc 1 stitch, K8 [46sts]. Work around for 1 inch. |
| |
 |
Knit 8 stitches with a 10 inch piece of contrasting-colored yarn of the same weight (this will be the thumb opening) |
| |
 |
Slip the 8 contrasting colored stitches back onto the left-hand needle. |
| |
| |  |
and knit them again with the attached glove yarn. |
Mark the beginning of your row with a piece of contrasting colored yarn.
K12, BL Inc 1 stitch, K16, BL Inc 1 stitch, K12 [44sts]. Work around for 1 inch.
K13, BL Inc 1 stitch, K16, BL Inc 1 stitch, K13 [46sts]. Work around for 1 inch.
Knit 15 sts, then K8 sts with a 10 inch piece of contrasting-colored, same-weight yarn (thumb). Slip these 8 contrasting colored sts back onto the left needle and knit them again with the attached glove yarn (see photos from right glove). |
Continue knitting around all stitches of the glove until 1˝ inches from the contrasting yarn.
|

Right glove, with thumb placed on right side of palm.
Left glove would be opposite, with thumb on left side. |
Put all the stitches onto two stitch holders divided as follows:
Place 23 palm side stitches on one holder, and 23 stitches for the glove back on the other holder. Holders should open toward the thumb side.
Leave working yarn attached while you work the thumb. |
| In the following instructions for knitting the thumb and fingers, when thumb and fingers are complete, the yarn is cut leaving a 10-inch tail. The tail is threaded onto a tapestry needle for removing stitches from the DP needles. The yarn inside the thumb and fingers should not be secured until all five digits are complete. You will want to try the glove on to make sure that all lengths fit properly. |

(1) Insert a DP needle into each of the 8 sts below the contrasting yarn. |
Pick up thumb stitches following steps 1 - 3: |

(2) Insert another DP needle into the 8 sts above the contrasting yarn. |

(3) Remove the contrasting colored stitches. |
Using yarn from the other end of the skein, or using a second skein of yarn, knit around the thumb, picking up 1 stitch at each side of the thumb on the first round [18sts]. You will need to divide the thumb stitches onto 3 needles.
Knit around for ľ inch, then K2Tog on back of thumb [17sts].
Knit around until thumb measures 1Ľ inches and K2Tog on front of thumb [16sts]. Knit around until thumb measures 2Ľ inches, then K2tog around [8sts].
Remove stitches with a tapestry needle and cut yarn leaving 10-inch tail. Do not secure yarn on inside of thumb yet. |
Slip 7 sts from each holder onto separate DP needles. Starting at the side edge, knit 7 sts, cast-on 2 sts, knit 7 sts from the opposite side [16sts].
Knit around until finger measures 1˝ inches from the 2 cast-on stitches. Next row, K2Tog on front of finger [15sts]. Knit around until finger measures 2Ľ inches and K2Tog on back of finger [14sts]. Knit around until finger measures 2ľ inches. K2Tog around [7sts].
Cut yarn, leaving 6 inches, and thread onto a tapestry needle. Remove stitches with the tapestry needle and cut yarn leaving a 10-inch tail. |
Slip the next 6 stitches from both stitch holders onto separate DP needles. Starting next to the index finger, K6 sts, cast-on 3 sts, K6 sts, pick-up 2 sts from the 2 cast-on stitches from the index finger [17sts].
Knit around until finger measures 2 inches. K2Tog at center front of finger [16sts].
Continue knitting until finger measures 2ľ inches, then K2Tog from back of finger [15sts].
When finger measures 3 inches, K2Tog around, ending K1 [8sts]. Remove with the tapestry needle and cut yarn leaving a 10 inch tail. |
Slip 5 stitches from both holders onto 2 separate DP needles. Starting next to middle finger, K5 sts, cast-on 3 sts, K5 from opposite-side, pick-up 2 sts from between ring and middle fingers [15sts].
Knit around until finger measures 2 inches. K2Tog at center front of the finger [14sts]. Knit around, when finger measures 2˝ inches, K2Tog at the back of the finger [13sts].
When finger measures 2ľ inches K1, then K2Tog around remaining sts [7sts]. Remove the stitches with a tapestry needle, and cut yarn leaving a 10-inch tail. |
Slip 5 sts from each holder onto separate DP needles. Starting next to ring finger, knit 5 sts, K5 sts from opposite-side, pick-up 3 sts between ring and little finger [13sts].
Knit around for 1˝ inches, then K2Tog at center front [12sts].
When finger measures 2 inches, K2Tog around [6sts]. Remove the 6 sts with a tapestry needle, and cut yarn leaving a 10-inch tail. |
Before you secure the ends of the thumb and fingers, try on your glove and make sure all the lengths are correct for you. You may need to add or delete a few rows.
Finally, bring the yarn tail to the inside of each digit, secure it and clip off excess yarn.
|
 |